EUC World is an application that, despite its multitude of features, is quite easy to use. Nevertheless, there are some functionalities which are not fully understood even by experienced users. On the EUC World blog I will successively explain all the functions and features of application so that you can take full advantage of its capabilities. Today, I will familiarize you to the main screen of the application – the view that shows the most important information and is displayed right away you start the EUC World app.
But before I go on to discuss the main screen, I will describe the two elements that are always displayed on the screen of your device – top bar and bottom bar.
Top bar
The top bar shows EUC World logo and buttons for the most important functions. The appearance of the logo reflects your account status. If your account has Premium status, the logo will reflect that status. It’s the easiest way to verify if your Premium account is active.

1 – Scan
This button is used to search (scan) for the wheel. It is only visible when a connection to the wheel is not active (button #2 is not green or flashing). Use this button to connect to a wheel for the first time or to connect to a wheel other than the last used wheel. If this button is not visible, press button #2 first to deactivate connection mode.
2 – Connect/disconnect
This button is used to connect/disconnect to the last used wheel. By default, after startup, the application will try to automatically establish a connection with the last used wheel, which will be indicated by flashing the icon of this button. After successful connection the button icon will turn green.
3 – Data logging
This button starts recording detailed data of the wheel to CSV file. This function works only during an active connection with the wheel. Depending on the application settings, it is possible to automatically start and stop data logging when connecting and disconnecting from the wheel.
4 – Application menu
This button opens the application menu.
Bottom bar
The bottom bar serves as a status bar and navigation bar. This bar can be minimized to maximize display area and its color indicates the application status.

1 – Current time and notifications
Here application notifications are displayed, and if there are none, the current time is displayed. Clicking on this item allows you to minimize the bottom bar. Clicking again returns the bar to its normal state.
2 – View navigation dots
These dots are used to indicate the active view (screen) of the application. The application view can be changed by swiping the finger on the sides of the screen (on the active view) or by clicking on the corresponding dot.
3 – Camera
This button opens the EUC World camera. It can be used to capture images and videos, which can include a speedometer overlay. If route recording is active, the captured images can be included in the tour recording.
Meaning of the bottom bar color
The bottom bar color corresponds to one of the five most important application statuses. In this way you can see at a glance, for example, if the connection to the wheel is active or if track logging is active.
No communication

Grey background of the bottom bar means that the application is not communicating with the wheel. In this state, parameters are not refreshed, application alarms do not work, etc. This is the initial state the application is in immediately after it is turned on. It is possible that the connect button to the wheel will be green, but the bottom bar will still be gray. This means that while the Bluetooth connection has been established, the wheel is not sending any data to the app.
Connected

The green background of the bottom bar means that the app is connected and communicating with the wheel. All application functions work in this state.
Connected and tour recording active

Brown background of the bottom bar means that the connection with the wheel and tour recording are active.
Not communicating and tour recording active

A dark blue background of the bottom bar means that tour recording is active, but there is no communication with the wheel. In this state, data obtained from GPS is still recorded, but no data from the wheel is recorded. Application alarms are also not working.
Firmware update
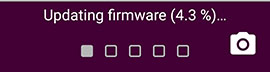
The purple background of the bottom bar indicates that a firmware update of the wheel is in progress. Do not turn off the app until the bar turns gray or green.
Main screen
The most important information such as speed, distance traveled, battery level and others are presented here. Some of the information is presented in graphic and text form, the meaning of which I discuss below.
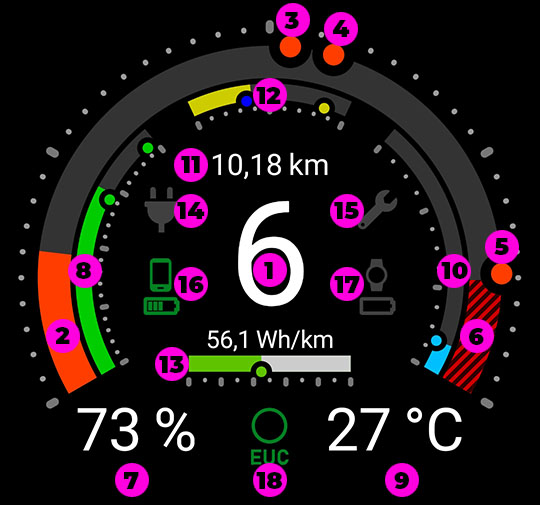
1 – Digital speed indicator
You can switch between km/h and mph using “General” menu.
2 – Graphical speed indicator
You can change indicator range using “Gauge” menu.
3 – Average speed marker
Indicates the average speed since the first connection with the wheel. If this speed is less than 5 km/h, the marker will not be displayed.
4 – Average speed in motion marker
Indicates the average speed. Unlike the average speed, the average speed in motion does not include stops. If this speed is less than 5 km/h, the marker will not be displayed. The moving average speed will always be greater than or equal to the average speed.
5 – Maximum speed marker
If this speed is less than 5 km/h, the marker will not be displayed. The maximum speed will always be greater than or equal to the moving average speed.
6 – Speed limit
Indicates a speed that is not achievable due to an active speed limit resulting from the wheel speed limit setting or a limit resulting from the low battery level (“speed throttling”). Function only available on some wheels.
7 – Digital battery level indicator
Please note that battery level indication may differ from app to app. You can change battery level algorithm using “General” menu. Before you change the battery level algorithm make sure your wheel is connected and no tour recording and CSV logging are active.
8 – Graphical battery level indicator
The marks displayed on the indicator scale represent the minimum and maximum battery level.
9 – Digital temperature indicator. You can switch between °C and °F using “General” menu.
10 – Graphical temperature indicator
The markers displayed on the scale represent the minimum and maximum temperature. If the temperature is below 20 °C, corresponding marker will not be displayed.
11 – Distance / Heart rate
Shows the distance traveled. If heart rate information is available (e.g. from a connected watch), this indicator will alternate between distance traveled and current heart rate.
12 – Relative load indicator
This indicator shows the relative load on the wheel, calculated as the ratio of the current to the current alarm setting. 100% load corresponds to current equal to the current alarm setting or peak current alarm setting (whichever is greater). The green marker indicates the maximum load while riding. The blue marker indicates the maximum load during braking (regeneration). Both values are recorded from the moment of first connection to the wheel.
13 – Energy consumption indicator
The range of the indicator is 50 Wh/km. The digital display indicates the instantaneous energy consumption and the green marker indicates the average energy consumption. This function is only available on some wheels.
14 – Wheel charging icon
Available only on certain wheels.
15 – Wheel failure icon
Available only on certain wheels.
16 – Phone battery level
17 – Watch battery level
The indicator is grey when the watch is not connected.
18 – Dashboard mode
You can switch between EUC data view and GPS data view by swiping up and down on the main screen. You can use GPS mode when the connection to the wheel is not active. You can also easily compare the distance traveled and speeds recorded by the wheel and GPS just by switching between modes.